Get a Free Seo Audit in Minutes
Get a Free A Step-by-Step Guide to Migrate from Shopify to Other Platforms SEO Audit in Minutes
Are you planning to move your website from Shopify to a different eCommerce platform?
Know that, you’re not alone!
Most new eCommerce businesses use the Shopify platform when they start out since it’s quite easy to build a Shopify store and start selling online. And it is rightly so.
Shopify is indeed a great platform for small or mid-sized businesses, and for entrepreneurs that don’t know how to build a website. However, when they scale up, there comes a time when the business outgrows the Shopify platform and needs more advanced features.
That’s when you might consider migrating your site to a platform that suits your business needs. In this detailed guide, you’ll learn how to successfully migrate your site from Shopify to a different platform.
First, let’s look at some of the reasons why businesses may want to migrate their Shopify site to a different platform.
Customisation Limitations
Although Shopify offers you plenty of great features, it’s not as customisable as open-source eCommerce platforms like WooCommerce or Adobe Commerce. These self-hosted platforms allow you to customise nearly every aspect of your eCommerce store.
Besides, Shopify uses a different setup — Shopify Liquid — for theme customisation as compared to other platforms which use PHP. Since most web developers may not be acquainted with Liquid, they’d find it difficult to customise themes on Shopify.
So while Shopify’s simple drag-and-drop site builder is an ideal choice for novice developers, limited customisation can annoy savvy developers who want to customise all the aspects of their website.
High Pricing
Pricing is another reason that may compel you to switch from Shopify to a different solution. While its basic plan is affordable, it offers limited features. But if you require advanced features and integrations, the plans become much more expensive.
On the other hand, some alternative platforms offer similar features and capabilities at significantly lower costs.
So if you’re looking for a more cost-effective solution for your business, you can consider moving to another platform.
Issues in Built-in Blog
Today, SEO and content marketing are key components of the marketing strategy of an eCommerce business. If you want to grow your business through these channels, you need a comprehensive content management system (CMS) integrated into your website.
Shopify has a built-in blog feature but it lacks the flexibility and functionalities that you’d require to support your content marketing strategy.
For instance, if you require advanced blogging features such as custom templates, scheduling & automation, the latest editor, etc., you’d be disappointed with Shopify’s built-in blog.
Besides, it also lacks a crucial blogging feature — blog post categorisation. So you may want to move to a platform that offers you a robust blogging solution on your website.
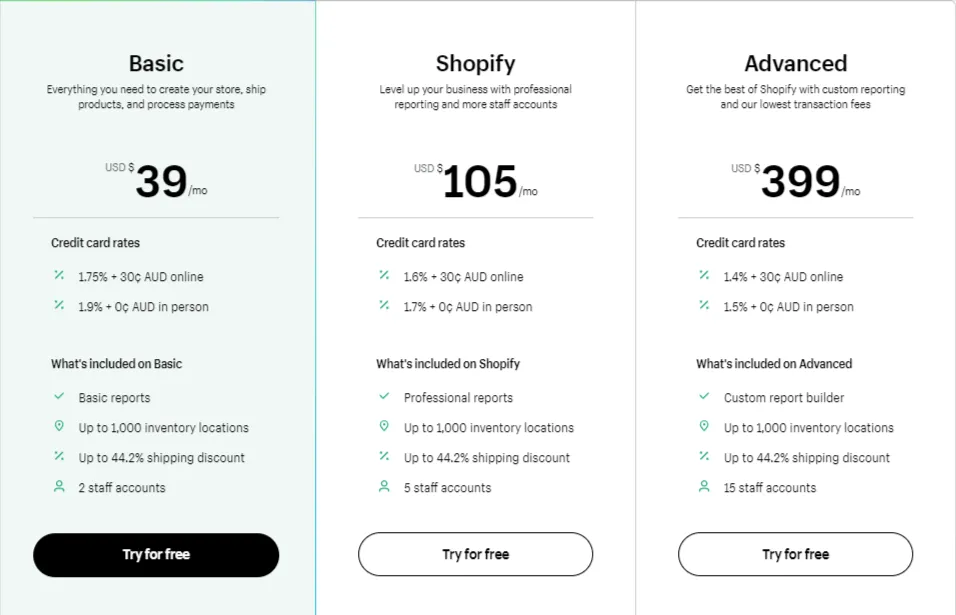
Transaction Fees
Shopify charges transaction fees for third-party payment gateways. So if you’re receiving your payments from a non-Shopify payment gateway, transaction fees are:
- 2% for Basic plan,
- 1% for Shopify plan, and
- 0.5% for the Advanced plan.
Moreover, they also charge you for each credit card transaction on your site. These charges can add up to make a huge sum when sales volumes are high. This would ultimately reduce your profit margins.
Lack of Control over Data
When you use Shopify, your data such as customer information, product details, order & payment history, etc. are stored on Shopify’s servers. Thus, you don’t have complete control over your data.
This can be a significant issue when you want to make changes to your data. And when you want to migrate your website from Shopify to a different platform, you can only export CSV reports.
Hence, for businesses that require complete control of their website data, Shopify can be a disappointing experience.
No Email Hosting
Since Shopify doesn’t provide email hosting, you may need to find an alternate solution for email marketing and customer communications. This can be a challenge if email is your primary channel for customer communications.
It means you’d have to rely on external email hosting tools to manage your communications and email marketing campaigns. This would increase your monthly costs on technology.
Migrating your e-commerce site from Shopify to another platform can seem like a daunting task, but with proper planning and execution, it can be a smooth and successful process.
In this chapter, we’ll discuss a step-by-step migration process which includes the pre-migration, launch, and post-migration stages.
2.1 Pre-migration Stage
Here are some of the crucial pre-migration aspects you must consider for successful website migration.
Planning
The first step in the pre-migration stage is to plan your migration.
It starts with creating an end-to-end migration checklist. Also, you need to anticipate and procure the resources for the migration project.
Consider these factors while creating your checklist and planning your migration resources:
-
Goals: What are the objectives of the migration project? For example, do you want to improve your website's performance, gain more control over your data, or reduce costs?
-
Scope: What parts of your website will you be migrating? Will you be moving your entire site or just certain sections?
-
Team: Who will lead the migration process and who will be involved in planning & execution?
You should also check whether you’re well-equipped to handle the process in-house or require assistance from an external SEO agency.
-
Concerns: What are the major concerns around the migration process? For instance, will the keyword rankings and traffic stay consistent or will they be impacted?
-
Risks: Assess the risks associated with the website migration process. For example, will you experience downtime, or will you be at risk of losing traffic or sales?
Crawl the Existing Shopify Site
Next, crawl your existing Shopify website to get an idea of the structure and content. This process will provide you with information such as title tags, headings, subheadings, canonical tags, meta-description, internal and external links, noindex/nofollow pages, server status, etc.
This way, you can take stock of your URLs and content inventory. And, you’d also come to know if there are any issues on your site that need to be fixed during the migration process.
You can use tools like Screaming Frog, Ahrefs, Semrush, etc. to crawl your site.
Record Benchmarks
Your historical data is important for analysis purposes. But sometimes, you may lose analytics data during a website migration. So it’s advisable to keep a record of these benchmarks.
This includes tracking important website metrics such as page views, bounce rate, and conversion rate. This will allow you to compare your site’s performance before and after migration and identify any areas for improvement.
Define SEO Requirements
When you migrate your site to a new CMS, you must outline your SEO requirements for web developers. This is even more important when you’ve hired an external agency to design and develop your new website.
Some of the key SEO considerations for web developers include:
- Site structure and speed
- Meta data (titles and descriptions)
- URL structure
- Headings, subheadings, and body content
- XML sitemaps
- Structured data
- URL redirects
- Mobile optimisation, etc.
Identify Priority Pages
You can measure the success of migration based on the quantity and quality of pages moved from your Shopify site to the new platform.
Hence, you need to identify the priority pages on your site. These may include your homepage, product pages, and any pages that receive a lot of traffic or generate significant revenue. These pages should be given priority during the migration process to ensure that they are up and running as quickly as possible.
You can check your top-performing pages in Google Analytics by clicking on Behaviour>Site Content>All Pages tabs on the side panel.
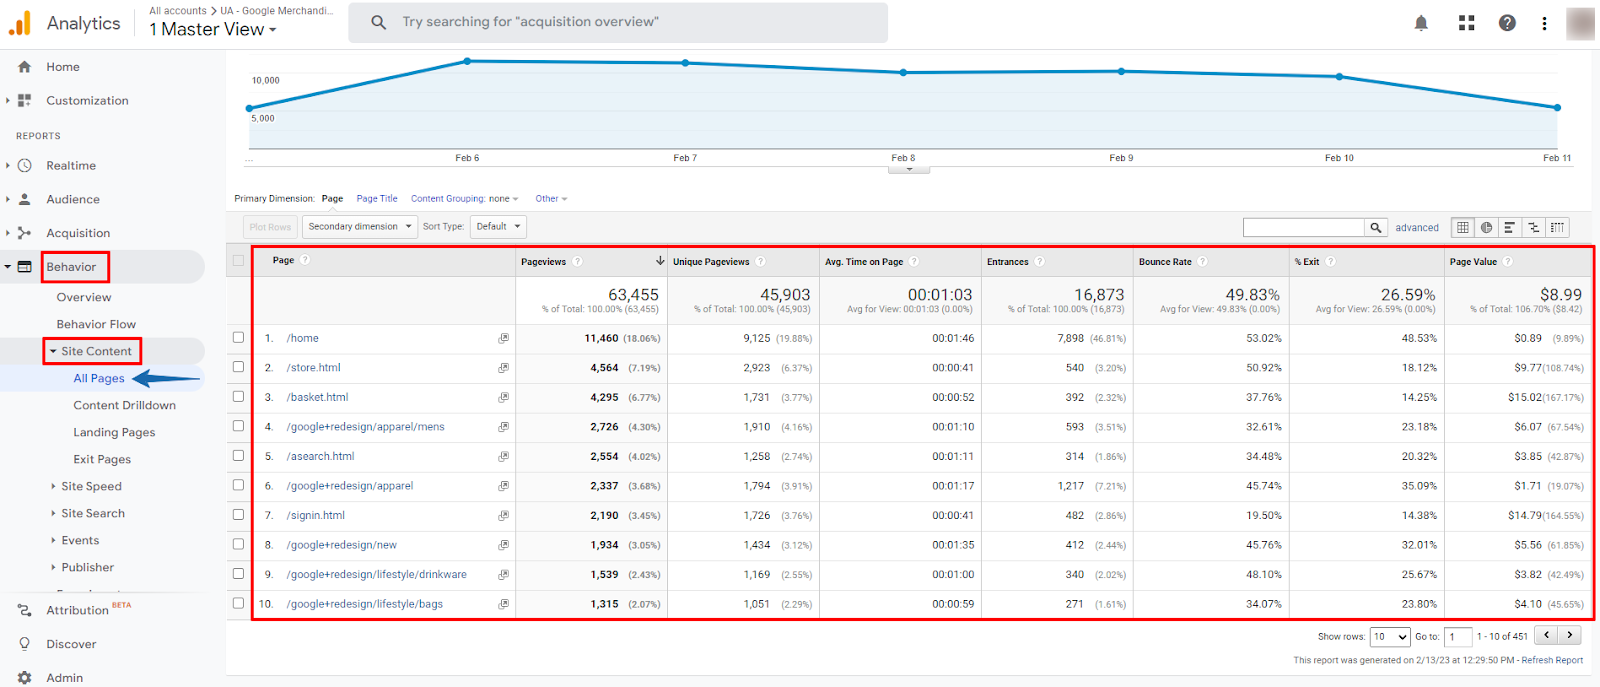
Export these URLs into a spreadsheet to check whether they’re migrated successfully on the new platform.
Map your URLs
If you’re going to make changes in the URL structure of your webpages, you need to map your existing Shopify site's URLs to the URLs of your new site. This is important because changes to a website's URLs can affect its search engine ranking, and any broken links can negatively impact user experience.
Here’s what you need to do:
- Create a spreadsheet with two columns to record the old and new URLs.
- Map each old URL to its corresponding new URL in the spreadsheet.
This sheet will be helpful in the next step — planning URL redirects.
Plan your Redirects
Planning URL redirects is a critical part of site migration. Redirects help search engines and users navigate through your site's removed, renamed, and relocated pages.
Search engines can establish the relationship between your old and new URLs with the help of redirects. Thus, you can retain the ranking of your old web pages and maintain consistent traffic.
That’s why you should proactively create a redirection plan before launching the new site to ensure everything is in place before making the switch. Also, make sure you’ve tested and verified the redirects before the launch.
Here are some best practices to follow when implementing URL redirection during site migration:
-
Use 301 redirects: 301 redirects are the most search engine-friendly way to redirect a URL permanently. They transfer the PageRank from the old URL to the new one and indicate to search engines that the old page has moved permanently to a new location.
-
Redirect individual pages: Redirect each page on the old site to the corresponding page on the new site.
-
Update internal links: After implementing URL redirection, make sure to update all internal links on your new site to point to the new URLs. This will ensure that users can easily navigate your site, and search engines can crawl all your pages.
-
Monitor redirects: Keep an eye on your site's traffic and rankings after migration. Check if any of your pages are still getting traffic from the old URLs and update the redirects accordingly.
2.2 Launch Stage
Now, it’s time to initiate the migration of your Shopify site.
The launch day can be exciting and scary at the same time. As long as you’ve spent enough time in preparation and conducted pre-migration testing, you won’t have many surprises (or shocks) during the launch.
Update DNS Settings
Shopify is a hosted eCommerce platform. So when you migrate your store from Shopify, you’d also move your site to a new server.
In this case, you need to update your DNS records to point them to the site’s new location. To accomplish this, your web development or IT team needs to coordinate with your old and new hosting service providers.
Make the New Site Accessible
Once your new site is ready and URLs redirects are set up, remove the limitations you may have set to restrict users and search engines on the new site.
It can include limitations like HTTP authentication, noindex tags, Robot.txt disallows, etc.
2.3 Post-migration Stage
Well done! You’ve just launched your new website.
But before you start your team celebrations, it’s important to ensure that everything is working well on your new site. Take the following actions to make sure your new eCommerce site is functioning properly.
Submit Sitemaps
Once you launch your new site, submit the XML sitemaps in Google Search Console (GSC) to inform Google to crawl your updated URLs. Sitemaps help search engines index your updated pages faster and more efficiently.
At the same time, ensure that the XML sitemap that contains your old URLs remains accessible on your Shopify domain at least for a month after the migration. This will help search engines find your new pages quickly.
Crawl New Website
Once your new website is live, perform a crawl to see if all the important pages are being crawled and indexed successfully.
In addition, keep track of crawl stats in GSC to ensure Google is crawling the pages on your new site. Also, check whether indexing settings are correct in GSC and find out if there are any crawl errors reported. This will help you to take quick remedial action.
Fix Post-migration Issues
Crawl report will highlight the anomalies and errors that the crawler encounters while crawling your new website.
For instance, if you crawl your site with a tool like Ahrefs site audit tool, it’ll highlight if there are issues like redirect errors, redirect chains, broken links, crawling & indexing errors, etc.
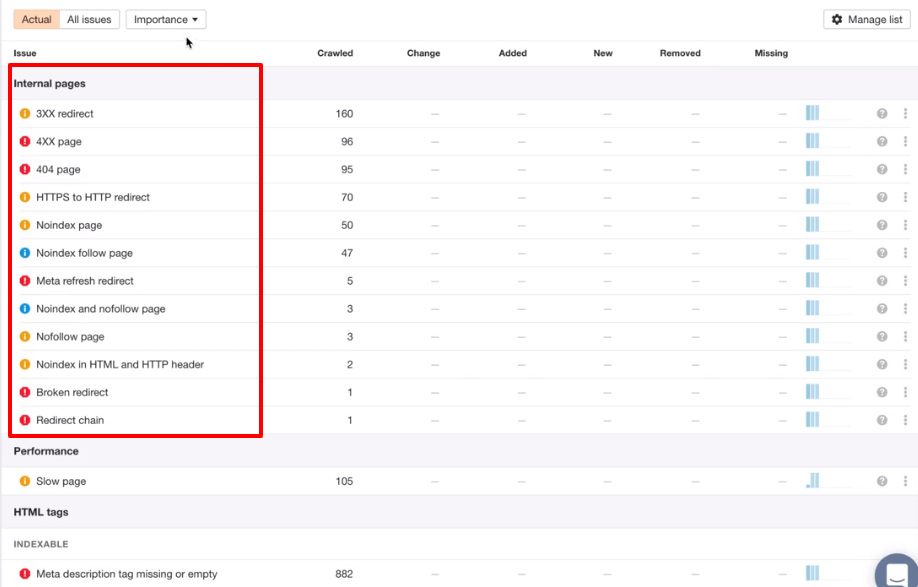
If you find such errors on your site, follow the recommendations given in the crawl report and fix the issues.
However, if you don’t have access to the premium SEO tools, you can use our Free Site Audit Tool. We recommend you conduct an SEO audit for your website regularly to keep its SEO health in check.
Set up Google Analytics and Google Search Console
It’s a given that you must register your new property (website) with GSC and Google Analytics (preferably Google Analytics 4) immediately after migration. This will help you avoid any potential gaps in data and reporting.
Monitor Performance
It’s common to experience a temporary drop in traffic after migration. But it’s advisable to closely monitor your site’s SEO performance initially to make sure that nothing major has been missed during the migration that affects traffic.
Also, note that the number of pages that were indexed from the old site should go down. And the number of indexed URLs from the new website should increase.
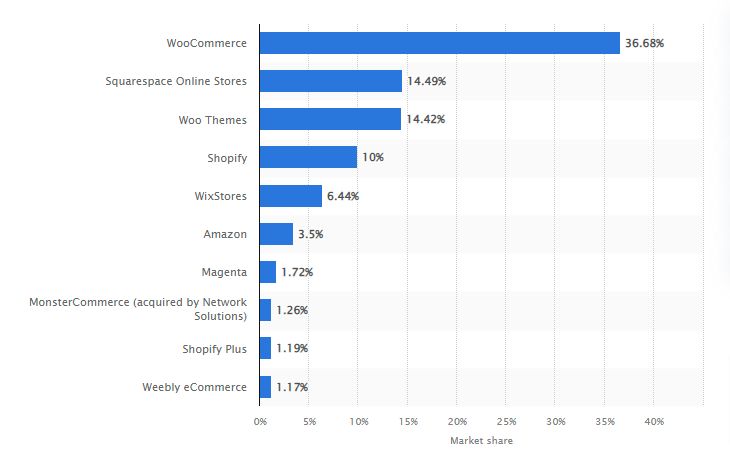
WooCommerce is arguably the most popular eCommerce platform globally. According to Statista, nearly 37% of eCommerce sites run on WooCommerce.
While Shopify is a fully hosted solution, WooCommerce is a self-hosted plugin built on top of WordPress. There are several reasons why you might want to migrate from Shopify to WooCommerce, such as lower costs, more flexibility, and better customisation options.
Now, let’s look at the migration options.
3.1 Manual Import/Export
Although manually exporting data from Shopify and importing it into the WooCommerce store is a time-consuming process, it’s a free option. And pretty straightforward too!
Here’s the step-by-step process to perform a manual migration from Shopify to WooCommerce.
Step 1: Export Your Shopify Data
The first step is to export your data from your Shopify store. For instance, let’s begin with exporting product data.
From your Shopify Admin, go to Products and click Export. Then choose the products you want to export and select the format of the CSV file as shown in the image.
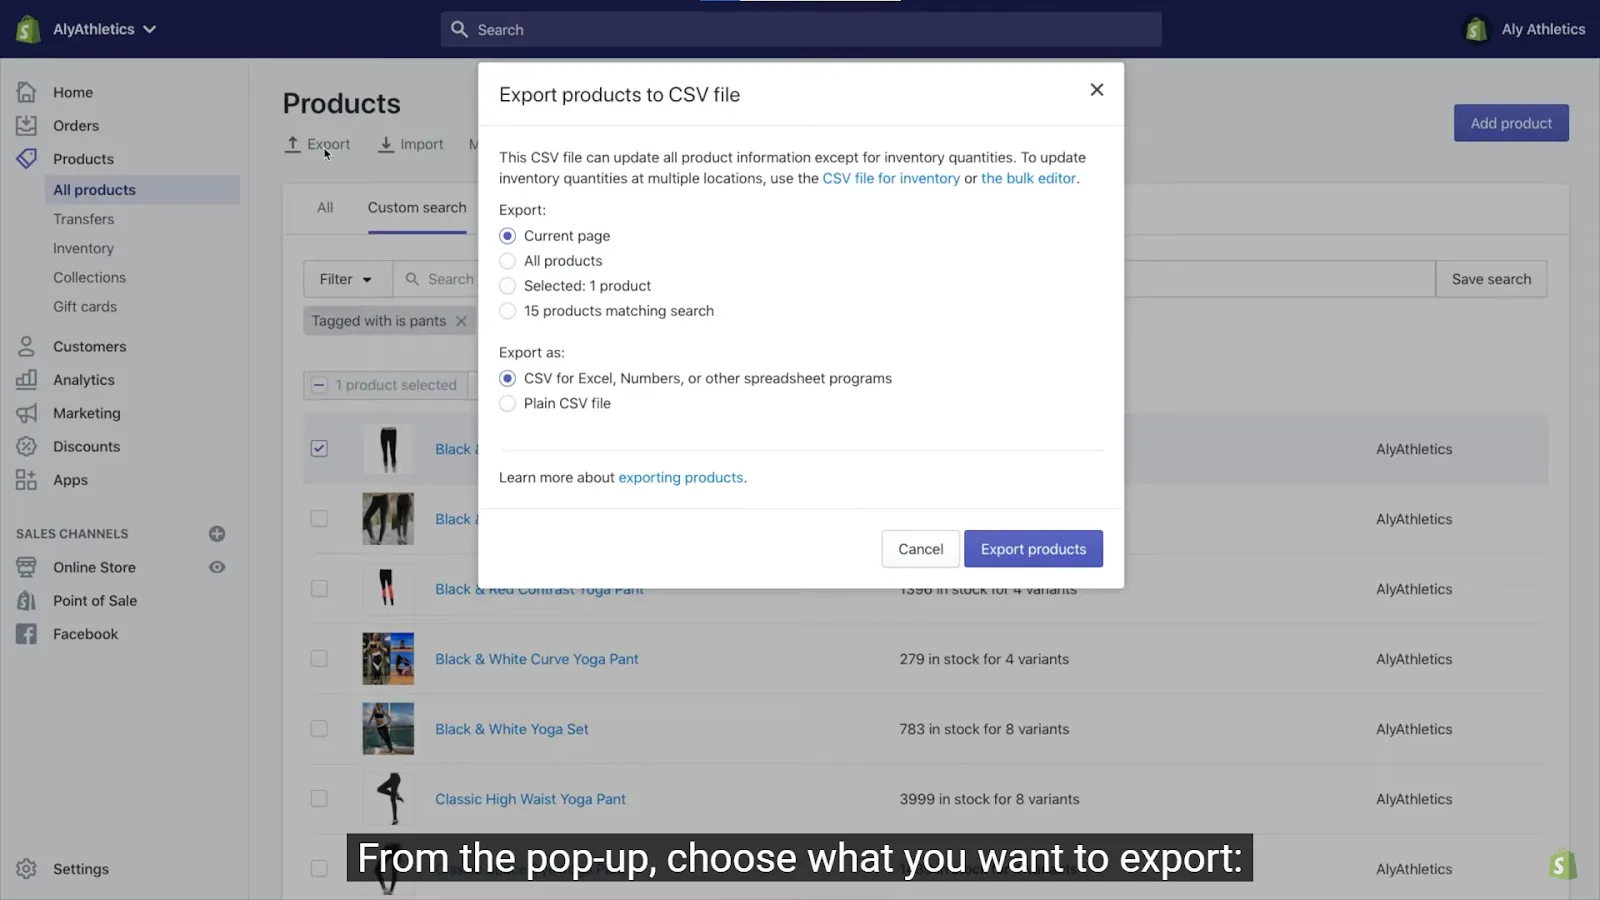
Next, click the Export Products button and Shopify will generate a CSV file containing your product data.
Similarly, you can export other information such as orders and customer data.
Step 2: Set Up Your WooCommerce Store
The next step is to set up your WooCommerce store. If you don't already have a WordPress website, you will need to create one. To install WooCommerce, go to the "Plugins" section in your WordPress dashboard and search for "WooCommerce." Install and activate the plugin.
Step 3: Import Your Shopify Data into WooCommerce
Once you’ve set up your WooCommerce store, you need to import your Shopify data. For this, navigate to WooCommerce > Products on your WordPress dashboard.
Then, click Import at the top and you’ll see a built-in product CSV importer.
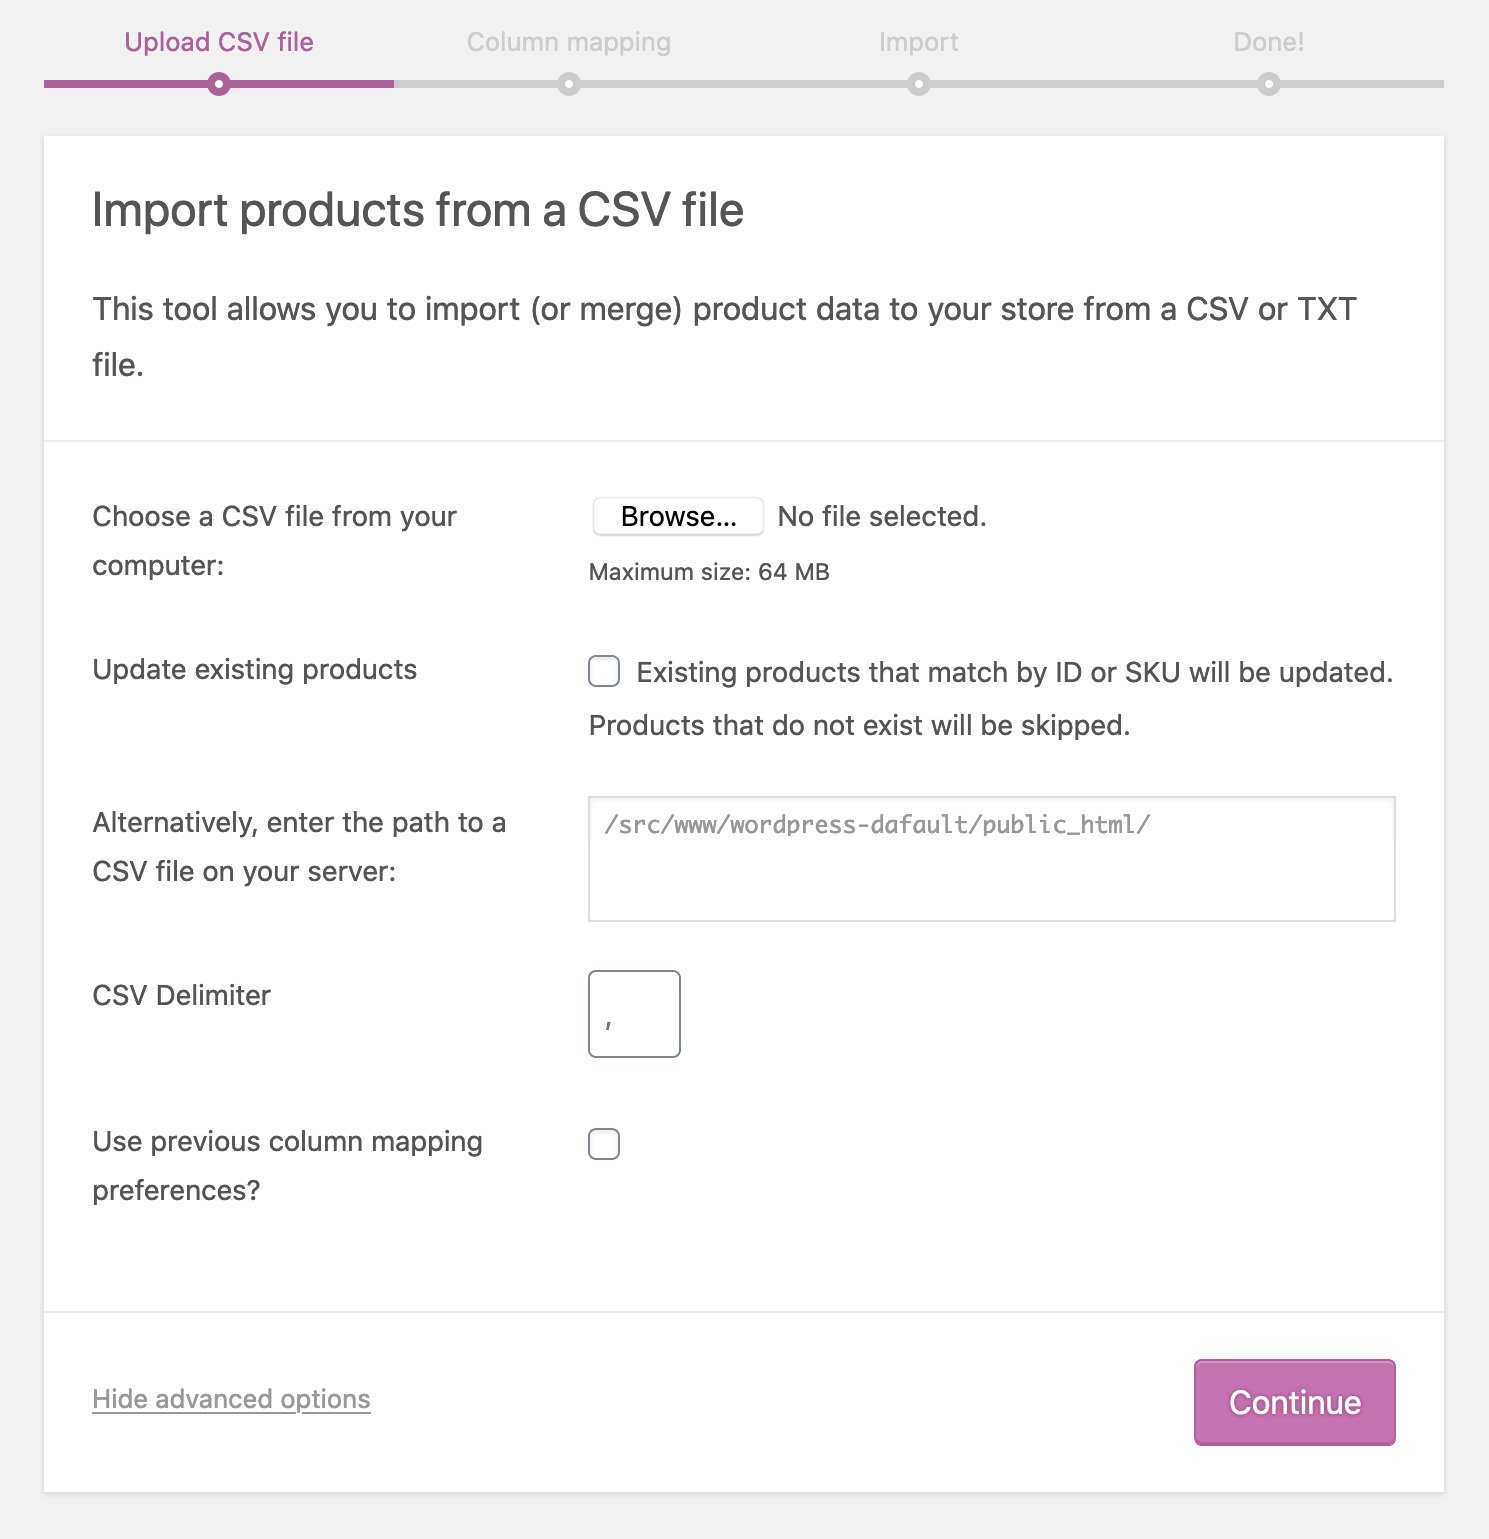
Next, choose the file you want to import and click Continue > Run the Importer. And wait until your products are imported into your WooCommerce store.
However, to import your orders and customer data, you’ll have to use extensions like Migrate & Import Shopify to WooCommerce or Customer/Order/Coupon CSV Import Suite.
Step 4: Set Up Your Payment Gateway and Shipping Options
WooCommerce supports a wide range of payment gateways, including PayPal, Stripe, and Square. To set up your payment gateway, go to the WooCommerce tab in your WordPress dashboard and click on the Settings option.
From there, click on the Payments tab and select your payment gateway. Follow the on-screen instructions to complete the setup.
Similarly, to set up your shipping options, go to WooCommerce > Settings > Shipping tab and select your preferred shipping options.
Step 5: Customise Your WooCommerce Store
WooCommerce offers you plenty of customisation options, including themes, plugins, and widgets.
To customise your store, go to the Appearance section in your WordPress dashboard and select a theme that suits your brand. You can also install additional plugins and widgets to add more functionality to your store.
Step 6: Test Your Store
Before you go live with your WooCommerce store, make sure you test it thoroughly to check if everything works perfectly.
You can also test your store by:
- Placing a few test orders,
- Checking payment gateways,
- Testing shipping options, etc.
Once you’re confident that everything is working as expected, you can launch your store.
3.2 Migrate with Cart2Cart
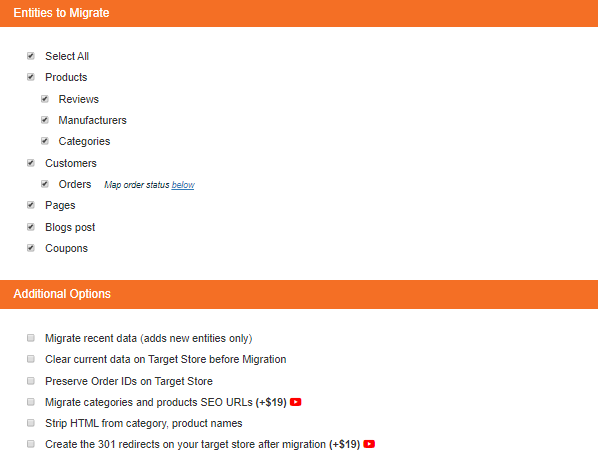
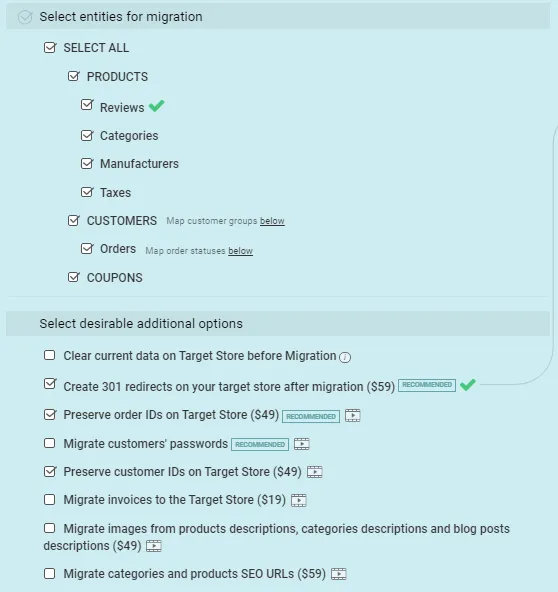
If you don’t want to migrate your site manually, you can use the Cart2Cart plugin on the WooCommerce store. It also allows you to perform a demo migration to see how the data transfer works.
You can migrate almost all your data such as:
-
Product data: SKUs, names, descriptions, prices, etc.
-
Product category information: Names, descriptions, and URLs.
-
Order data: Order dates, order numbers, quantities, shipping details, selling prices, order status, etc.
-
Customer data: Names, shipping and billing addresses, and emails.
-
Discount/coupon information: Codes, names, and discounts.
-
Blog data: Titles, URLs, publishing dates, content, media files, descriptions, etc.
Cart2Cart helps you migrate your Shopify store to WooCommerce in four simple steps:
- Set your Source Cart — Shopify, by providing the URL and API password.
- Set your Target Cart — WooCommerce, by providing your WordPress Admin details.
- Select the data entities you want to migrate.
- Start the migration process.
Depending on the size of your site, migration time can vary.
Here’s the exciting part:
While your data is being migrated, your Shopify store can continue to run in the background so that you don’t have to miss out on your revenue.
And for an additional cost, Cart2Cart will also help you with 301 redirects.
3.3 Work with an Expert
Now, if you don’t want any of the above two options, you can always consider hiring an external expert to help you with website migration.
At Supple, we can not only help you migrate your Shopify store to the WooCommerce platform but also optimise your new WooCommerce site for better rankings and traffic.
BigCommerce is built to handle high-volume eCommerce stores. So it’s an ideal platform if you have a large eCommerce store or a rapidly growing business. Besides, BigCommerce doesn’t charge additional transaction fees for using the leading payment gateways.
Also, it offers unlimited bandwidth, products, and staff accounts, making it a flexible platform for businesses of all sizes and scales.
Here are some key reasons to consider BigCommerce over Shopify:
- Better scalability
- More built-in features
- Better SEO tools
- Low transaction costs
- More payment options
That said, let’s look at the migration options.
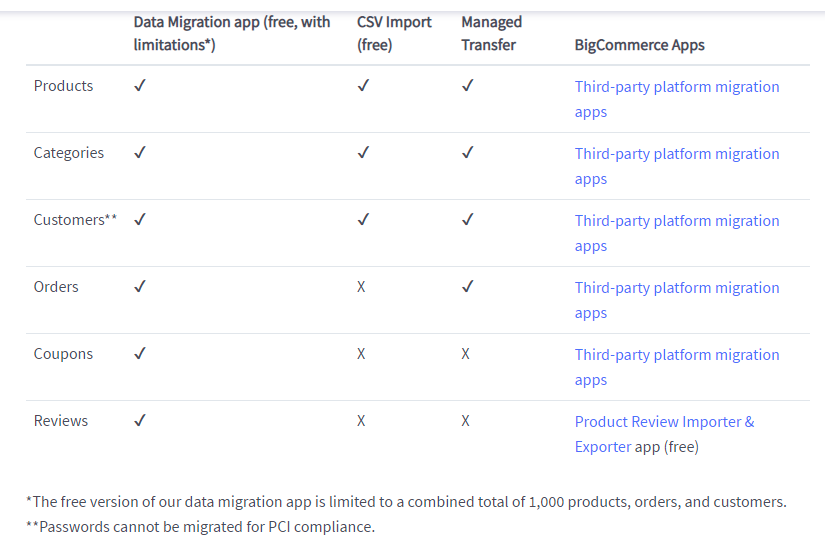
Image Source: BigCommerce
4.1 CSV Import
As you can see in the above image, CSV import is free but also has a few limitations. You can transfer basic customer details like name, address, phone number, email address, etc. However, passwords can’t be exported from most eCommerce platforms for PCI compliance. Hence, post-migration customers will be asked to reset their password when they attempt to log into their accounts.
Since Importing data from CSV files is a manual process, it requires time and effort. Here’s how you can go about it:
Step 1: Set up Your BigCommerce Store
Before you can begin the migration process, you need to set up your BigCommerce store. First, you have to sign up for a BigCommerce account and configure your basic settings.
This includes designing the store, setting up shipping & payment options, configuring navigation, etc. The idea is to keep your BigCommerce store ready except for the data migration part.
Step 2: Export Your Data from Shopify
Next, you need to export your data such as products, orders, customers, etc. from your Shopify store. Shopify will export these data into a CSV file which you can easily import into your BigCommerce store.
Read Chapter 3 > Manual Import/Export > Step 1 of this guide to learn how to export your data from Shopify.
Step 3: Import Your Data into BigCommerce
After exporting your Shopify data into CSV files, you can import it into your BigCommerce site.
To access the data migration interface, go to the admin panel of your BigCommerce store.
For instance, if you want to import customers, go to Customers > Import. Then next to the Import File (under the File Details section), upload your CSV file from your computer.
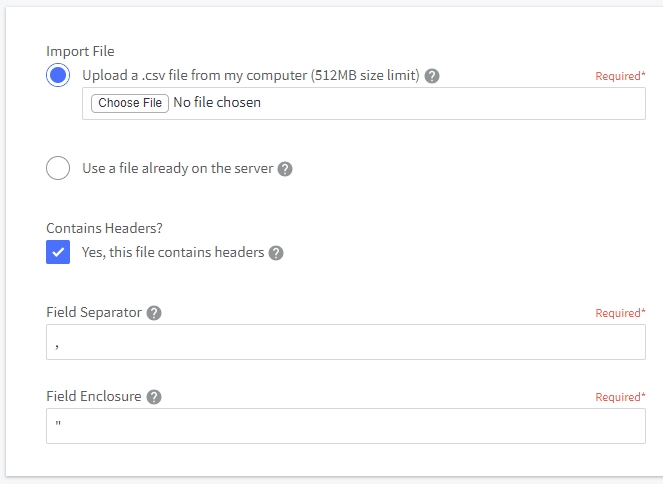
Click Next and match the fields as shown in Link Import Fields.
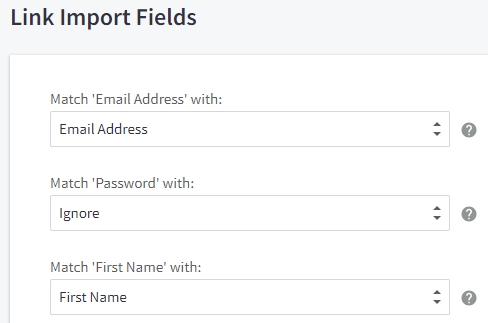
And, then click Start Import and it’ll start importing your customer data into your BigCommerce store.
Likewise, you can also import your products and categories to your new website.
Step 4: Test and Verify Your Migration
Once you’ve imported all your data into your BigCommerce site, you need to test and verify that your new store is working as expected. So, make sure all your products, categories, orders, and customers are migrated correctly.
Also, consider testing your payment and shipping options by placing a few test orders. And finally, take a final review of your site, make any edits if necessary, and launch your site.
Step 5: Redirect Your Domain and URLs
The next step is to redirect your domain and URLs to your new site. It’s a critical task that ensures your customers are able to access your store seamlessly after the migration.
So update your DNS setting to point to your new BigCommerce website. And also set up URL redirection so that old links to your Shopify store are redirected to the corresponding pages on your BigCommerce site.
4.2 Data Migration App
BigCommerce has dedicated data migration apps that help you transfer your data from different platforms to your BigCommerce store.
You can install the Shopify data migration app from its App Marketplace. This app works perfectly for small to medium-sized businesses. It requires you to export your Shopify data (products, customers, orders, etc.) into CSV files.
Then, this app would make a copy of your data and add it to your BigCommerce store without affecting your information on the Shopify site. Since Shopify doesn’t let you export categories and collections, it won’t automatically migrate to your new website.
However, the app will attempt to create product categories based on the Type field (if that information is available). Or else, all the products will get added to a single category.
Also, note that the Shopify data migration app is limited to a combined transfer of 1,000 products, orders, and customers. Once this limit is used up, you have to get the paid full version of the app.
For this, you’ll need to reach out to the BigCommerce Data Migration team at dmsapps@bigcommerce.com.
4.3 Third-party Platform Migration Apps
You can also use third-party platform migration apps such as LitExtension. It’s pretty simple and saves the time that goes into manually exporting the data from Shopify and then importing it into the BigCommerce store.
Here’s how you can migrate from Shopify to BigCommerce with LitExtension:
1. Create your LitExtension account by registering on its website.
2. Set your Source Cart by entering your Shopify store’s URL and API password.
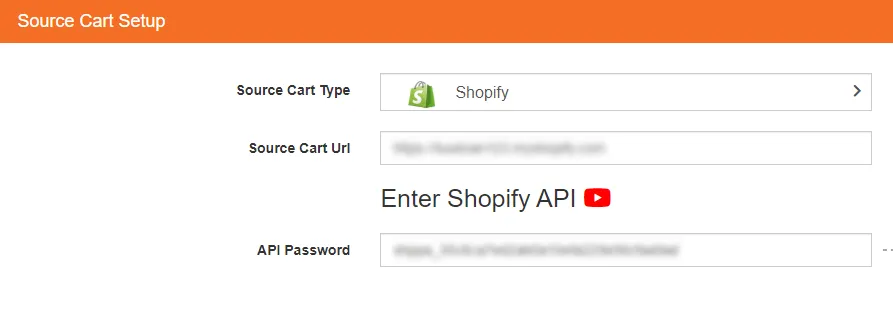
3. Set your Target Cart by entering your BigCommerce store’s URL and API details.
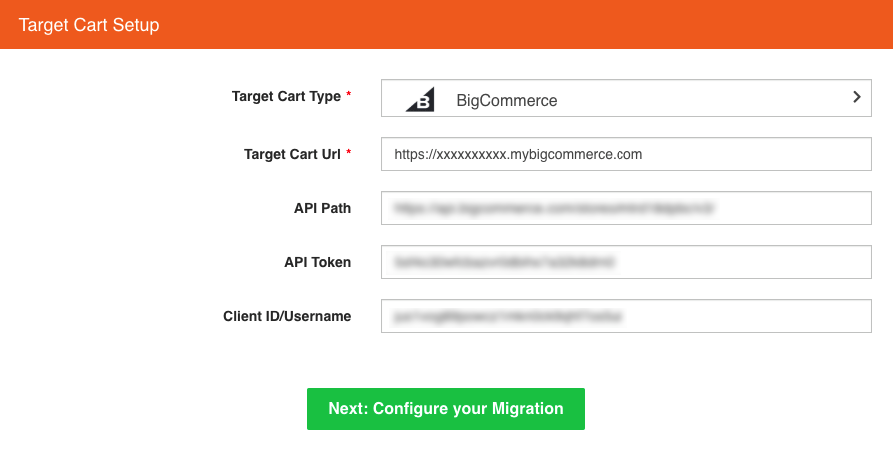
4. Select all the entities that you want to migrate from Shopify.
Next, you can choose to see a demo migration with limited data and then perform the full migration if everything is alright in the demo. Alternatively, you can also directly perform a full migration.
4.4 Managed Transfer
If you don’t want to migrate with any of the above three methods, BigCommerce also has a Managed Transfer service. When you opt for this service, their Data Migration Service Team will create a custom migration plan based on your business requirements and transfer your data securely.
Wix is also a no-code, drag-and-drop website builder, just like Shopify. But it offers you more design flexibility as compared to Shopify. Besides, Wix doesn’t charge transaction fees for using third-party payment gateways.
Also, it’s an all-in-one platform that offers a range of features beyond eCommerce, such as website hosting, marketing tools, and blog functionality.
Basically, it’s a more affordable Shopify alternative for small or medium businesses.
With that in mind, let’s learn more about the migration options.
5.1 Manual Migration with CSV Import
Here are the steps to migrate your e-commerce store from Shopify to Wix:
Step 1. Create a Wix Account
First, sign up for a free online store builder by creating your Wix account. Select the plan that best fits your needs and budget and build your online store that resembles your brand and existing Shopify store.
Then, add the required design elements, and set up payment methods and shipping options.
Step 2. Download the Wix CSV Template File
Wix would require you to upload the data in its own CSV template. So you need to download the Wix CSV Template File. On your Wix Dashboard go to Store Products Tab > More Actions > Import > Download CSV File.
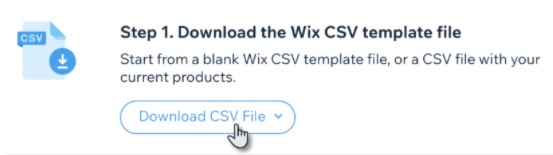
In the next prompt, choose Blank CSV Template which allows you to import products from another store.
Step 3. Export your Data from Shopify
Now, export your products, orders, and customers data from your Shopify website into a CSV file. Read Chapter 3 > Manual Import/Export > Step 1 of this guide to learn how to export your data from Shopify.
Step 4. Import your Data into Wix:
Then enter your product data into the Wix CSV Template File you’ve downloaded. Also, follow these instructions when you add the data into this template:
- Don’t delete or add columns.
- Don’t edit the column names.
- Ensure each product has a handleId, name, fieldType, price.
- Ensure each variant has a handleId, fieldType, optionChoices.
- In case you’re not sure how to fill out data in optional fields, leave them blank and make changes later if required.
Next, go to the Store Products Tab > More Actions > Import > Upload CSV File.
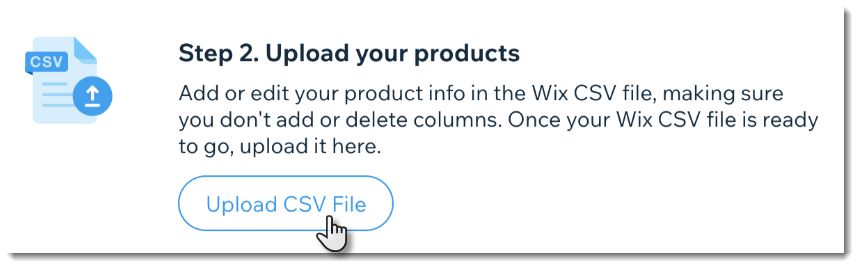
Once you upload the file, click Continue.
Step 5. Review and Configure your Store
After importing your data, review your Wix store to ensure that all your products, customers, and orders have been migrated successfully. Configure your store settings and design to match your brand and preferences.
Step 6. Redirect your Domain
Once you are ready to go live, redirect your domain from your Shopify store to your new Wix store. You can do this by updating your domain settings in your domain registrar account to point to your new Wix store.
5.2 Migrate Using Cart2Cart App
The other simple way to migrate your Shopify data to your Wix store is by using the Cart2Cart Migration App. Here’s what you need to do:
1. Install Cart2Cart app on your Wix store and sign up for it.
2. Set your Source Cart (Shopify) and Target Cart (Wix). And fill-in the URL and API details as shown below.
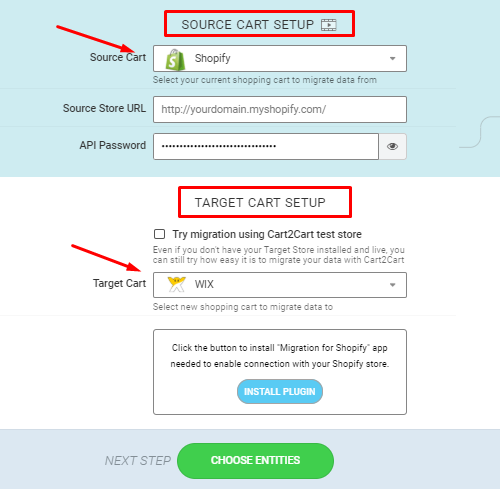
3. Select the data entities to be migrated and any additional services you may need.
4. Start the migration process.
Squarespace is known for its beautiful and modern design templates, which can give your online store a high-end and sophisticated look. Squarespace offers an all-in-one platform that includes website hosting, eCommerce functionality, marketing tools, and blog functionality.
Thus, Squarespace is a convenient option if you want to manage all aspects of your online presence in one place.
Here are the migration options.
6.1 CSV Import
Follow the below steps to migrate from Shopify to Squarespace with a manual CSV import method.
Step 1. Set up Your Squarespace Store
Visit the Squarespace website and create your account. Then, set up your Squarespace store and configure the basic settings.
You can either start with a free trial for 14 days or directly subscribe to the paid plan that meets your online store’s requirements and budget.
Step 2. Export your Data from Shopify
Next, go to your Shopify store and start exporting your data such as orders, customers, products, etc. into a CSV file. Read Chapter 3 > Manual Import/Export > Step 1 of this guide to learn how to export your data from Shopify.
These data will then be imported into your Squarespace site.
Step 3. Import your Data into Squarespace
Squarespace allows you to import some of the content from your old site — Spotify, in this case. However, you can’t import your Shopify store’s design, layout, and fonts.
Here’s how you can import your products into your Squarespace store:
-
Go to the Commerce panel > Inventory.
-
Click the “...” icon in the top-right corner.
-
Click Import and select Shopify from the Import Products menu.
-
Just drag and drop the .csv file into the upload box.
-
Hit Import.
Once the import is finished, you’ll see a Success message.
Squarespace also has additional import tools to import data like:
-
Webpages and blog posts: Tutorials for importing content from WordPress, Blogger, and Tumblr.
-
Podcasts: Tutorials for importing archived podcasts using SoundCloud blocks or Audio blocks.
Step 4. Configure your Store Settings and Design
After importing your data, configure your Squarespace store settings and design to match your brand and preferences. Then set up payments & shipping methods and configure tax settings.
Step 5. Test your Squarespace Store
It is important to test your new Squarespace store thoroughly before going live. Test its functionality, checkout process, and payment processing to ensure that everything is working properly.
Step 6. Redirect your Domain
Once you are ready to go live, redirect your domain from your Shopify store to your new Squarespace store. You can do this by updating your domain settings in your domain registrar account to point to your new Squarespace store.
6.2 Third-party Platform Migration Apps
The easier way to migrate from Shopify to Squarespace is by leveraging a third-party platform migration app like Cart2Cart or LitExtension. While using these apps will cost you some money, it’ll save a lot of time and transfer all the data that you want.
So if you want to perform site migration with automated tools:
- Read Chapter 3.2 to migrate using the Cart2Cart app.
- Read Chapter 4.3 to migrate using the LitExtension app.
Magento (Adobe Commerce) — being an open-source eCommerce platform, it offers a greater level of customisation and scalability to your eCommerce business. It can be an ideal platform for medium to large businesses.
Here are the ways you can migrate from Shopify to Magento 2.
7.1 Manual Migration
Here’s the process to migrate from Shopify to Magento using the manual CSV Import method.
Step 1. Create your Magento 2 Store
First, you need to create your Magento 2 website. It’s important to note that setting up a Magento 2 site requires a bit of technical know-how. So if you’re not familiar with coding a website, you can hire a professional web developer to do it for you.
Alternatively, you can also refer to this guide on building a Magento website.
Step 2. Export your Data from Shopify
Then, export all your necessary data from the Shopify store into a CSV file. Read Chapter 3 > Manual Import/Export > Step 1 of this guide to learn how to export your data from Shopify.
Step 3. Import your Data into Magento
Log into your Magento store and go to the Admin panel. Then click System > Data transfer > Import.
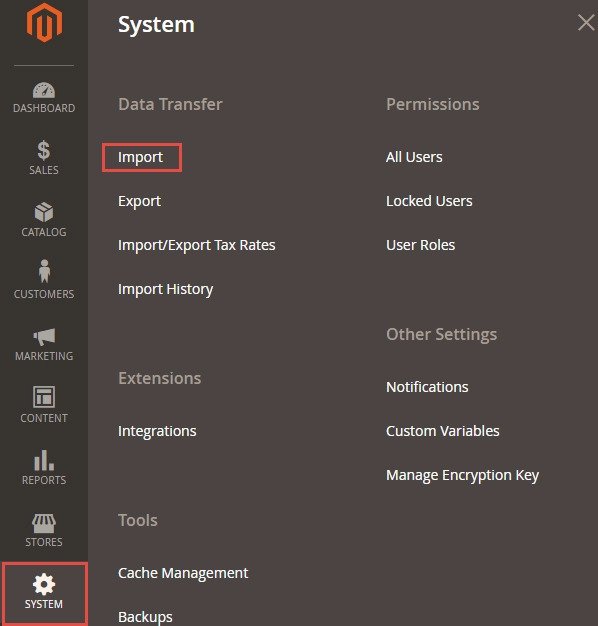
After that, choose the type of data you want to import from your CSV file into the Magento Store.
Make sure you’re uploading the right file for the data type you choose in the Import drop-down menu. And click Import.
The time required for the migration will depend on the amount of data being transferred.
Step 4. Check your Website Post-migration
After the migration process is complete, you need to verify that all of your data has been migrated as expected. This involves checking that all of your products, customers, and orders are present in your Magento store and that the data is accurate. Review your store settings and design to make sure everything is configured correctly.
Step 5. Test your Store
Once you have reviewed your store, test it thoroughly before going live. Check your site's functionality, checkout process, and payment processing to ensure that everything is working properly.
Step 6: Launch your Magento Store
Once you have set up your Magento store, it's time to launch it. Also, make sure you redirect your domain from your Shopify store to Magento site by updating your DNS settings in your domain registrar account.
7.2 Third-party Platform Migration Apps
As mentioned earlier, the easiest and quickest way to transfer your data from Shopify to a new website is by using third-party migration tools.
So if you prefer this method:
- Read Chapter 3.2 to migrate using the Cart2Cart app.
- Read Chapter 4.3 to migrate using the LitExtension app.
Website migration is a complex process and requires a great deal of planning and careful execution. While every website migration is different, there are some common mistakes that usually happen during site migration.
Let’s take a look.
Not Having a Strategy
Migration strategy defines the direction for your team. This makes it one of the most crucial parts of website migration.
Ironically, lack of clear strategy is one of the most common mistakes that businesses make when migrating their site from Shopify. And the reason for an unclear migration strategy is setting unrealistic and immeasurable goals.
You must have a well-defined plan that outlines the specific goals and objectives of your migration project. For this, you must know what you want to achieve through site migration — whether it be improving the site's performance or adding new features. You should also consider the impact the migration will have on your business and how it will affect your customers.
Thus, without a clear strategy in place, your migration project is likely to be disorganised and inefficient. And you may end up spending more time and money than you anticipated, and the end result may not meet your expectations.
Inadequate Planning
Although strategy and planning may sound similar, they both are separate pitfalls when it comes to website migration projects.
Site migration planning involves:
- Having a comprehensive migration checklist that includes things to consider during pre-migration, launch, and post-migration stages.
- Creating a migration team consisting of professional website developers, SEO specialists, UX designers, IT staff, and so on.
- The coordination of work pace and schedules of different departments.
- A detailed project timeline with well-defined milestones.
- Having a realistic launch date deadline. You must avoid the peak traffic season in order to minimise the business impact.
- Contingency planning — in case the deadlines have to be revised.
- Plan of action to deal with potential risks that may arise during the migration project.
Additionally, you also need to account for factors that are specific to your business type.
Not having such a detailed migration plan can result in delays and wastage of resources.
Not Consulting Professional SEOs and UX Designers
Another mistake that businesses make when migrating their site from Shopify is not consulting with professional SEOs and UX designers. SEO and UX are critical to the success of any eCommerce site, and you need to ensure that your new site is optimised for both.
Consulting with professional SEOs and UX designers can help you identify potential issues and opportunities that you may have overlooked. They can provide valuable insights into how to optimise your site for search engines and how to create a user-friendly experience that will drive conversions.
Poor Testing
Testing is an essential part of any site migration project, but it's often overlooked or rushed. Poor testing can result in a site that is slow, buggy, or unresponsive, which can lead to a poor user experience and a loss of customers.
To avoid this, you need to conduct thorough testing of your new site before it goes live. This includes testing for functionality, usability, speed, and performance. You should also test your site on different devices and browsers to ensure that it works well for all users.
Slow Response to Bug-fixing
Often, site migration teams get complacent once the new website is live and fail to anticipate that the new website may have some bugs or errors that deteriorate user experience.
A slow response to such errors can eventually lead to a loss of customers. So, you need to be prepared to respond quickly to any issues that arise and have a plan in place for addressing them. This includes having a dedicated team that is responsible for monitoring the site after the migration and having a process in place for prioritising and fixing bugs.
Conclusion
Migrating from Shopify to a different platform can seem like a daunting task, but with careful planning and execution, it can be done smoothly and efficiently.
Remember, you need a clear strategy in place and plan carefully considering all the usability and business implications. Also, choose the new platform keeping the big picture and long-term vision in mind so that you don’t have to change your eCommerce platform again in a short duration.
Follow the steps outlined in this guide and avoid the common pitfalls. With the right approach, you can move your business from Shopify to a more suitable platform for your business and reap its benefits.
Need expert help for your Shopify site migration project? Get in touch with us and our team of web developers, SEOs, and UX designers will help you move your business to the right eCommerce platform.
Can you move your website from Shopify?
Yes, you can move your website from Shopify to another platform. Shopify provides a built-in migration tool to export your product, customer, and order data to CSV files. You can use these files to import data into another platform, such as WooCommerce, BigCommerce, Wix, Squarespace, or Magento. Additionally, you can hire a developer or migration service to assist you with the migration process.
How do I export my data from Shopify?
To export your Shopify website data, you can follow these steps:
-
Log in to your Shopify admin dashboard.
-
Go to the Settings section and click the Export tab.
-
Here, you can choose the data you want to export — products, customers, and orders data.
-
Select the data type and click Export.
Shopify will export your selected data into a CSV file.
When should I move away from Shopify?
You may want to move away from Shopify if you need more advanced eCommerce features or greater control over your website. Shopify is a great platform for small to medium-sized businesses, but it may not be suitable for larger or more complex eCommerce websites. Additionally, if you're looking for more flexibility in terms of customisation or if you want to own your website, you may want to consider other platforms.
How do I close my Shopify store but keep my domain?
You can keep your domain name even after closing your Shopify website if you have registered your own domain name. It means you’re not using Shopify’s subdomain name.
However, if you’ve been using Shopify’s subdomain name, you need to transfer it to another registrar before closing your Shopify domain. This way, you can keep your domain name after closing your Shopify website.
Can I transfer my Shopify store to Wix?
You can transfer your data like customers, products, orders, etc. from your Shopify store to Wix. But you can’t transfer your entire Shopify store to Wix. Shopify and Wix are different platforms, and there is no direct way to transfer your store.
Can I move my website from Shopify to WordPress?
Yes, you can move your website from Shopify to WordPress. WordPress is a powerful and flexible platform that allows for more customisation options than Shopify. To move your website from Shopify to WordPress, you will need to export your data from Shopify and import it into WordPress. There are also migration tools and services available that can assist you with the process.
What are the disadvantages of Shopify?
Here are some common disadvantages of Shopify:
-
Limited customisation options
-
High pricing
-
Transaction fees for third-party payment gateways
-
Issues in built-in blog
-
Limited control over data and hosting
-
Limited SEO capabilities
-
No email hosting, etc.

Information Gain in SEO: Elevating Your Content Strategy

AI Overviews / Google Search Generative Experience (SGE) and How It Will Impact SEO in Australia

6 Takeaways for SEOs From Google’s Antitrust Trial
Marketplace SEO Guide

A Complete Guide to YouTube SEO in 2024

How to Learn SEO in 2024

Google SERP Features

SEO Forecasting

Understanding the Impact of AI on SEO: A Comprehensive Guide

How to Migrate Your Site Away From Woocommerce

Email Marketing Guide

How to Migrate Your Site Away from Magento
SEO Ranking Factors – What Are The Important Ones?

Digital Marketing Channels – How to Choose the Best One for Your Business?

How to Perform SERP Analysis for a Better Content Strategy?
SEO Log File Analysis

Content Distribution Guide

Audience Profiling Guide
Startup SEO Guide
Ecommerce Content Optimization Guide