How to Use GSC for your SEO efforts?

How to Use GSC to Improve SEO Performance?
When it comes to ranking your website on Google search results, the first thing you’ll need is a good SEO strategy.
Although, a good SEO strategy alone cannot help to achieve your desired results. To aid your SEO strategy, you must also use powerful SEO tools that help to accelerate your website’s SEO performance on search engines.
The right SEO tools can help you to collect critical insights on how your SEO strategy is playing out in real-time.
And there are plenty of paid SEO tools that help you do just that.
But, did you know that there is a free SEO tool that provides better, more in-depth and accurate insights than any paid tools out there?
We’re talking about Google Search Console (GSC).
For the uninitiated, It’s a free SEO tool from Google that helps website owners collect and generate actionable insights on the overall performance of a website on Google search results.
Though most people believe that GSC is there just to help website owners check vanity metrics like clicks and impressions. But truth be told, GSC is capable of much more than that.
If you want to learn how to get the most out of GSC, then this post is for you.
Below, we have shared how to use GSC to improve your website’s SEO performance.
What is Google Search Console?
Google Search Console is a free and powerful SEO tool from Google that allows you to monitor and troubleshoot your site’s performance on Google search results.
GSC helps you identify and fix technical SEO issues, submit sitemaps, monitor backlinks, and much more.
In layman’s terms, GSC is a collection of tools that helps website owners ensure their site is healthy and Google-friendly.
Some of the important features of GSC include:
- Identify and fix errors
- Review internal and external links
- Monitor indexing and crawling
- Request indexing of updated/new pages
- Overview of your site’s search performance
Now that you have the basic idea of what is Google Search Console, the next thing you need to learn is how to set up GSC.
You can’t start using GSC until you’ve added your website as a property to GSC.
So let’s go through the step-by-step process to set up GSC for your website.
Setting up Google Search Console
To set up Google Search Console for your website, you need to head over to the official GSC website and click the Start Now button.
After that, you’ll need to either create a Google account or log in to your existing account that you’d like to associate with GSC.
Now, if this is the first time you’re using Google Search Console, you’ll be asked to choose the type of property you want to add — Domain property or URL prefix property.

- Domain Property: This type of property provides website owners with a comprehensive overview of their site’s SEO performance, including all subdomains’ URLs on HTTP & HTTPS.
- URL Prefix Property: As the name suggests, a URL prefix property only includes URLs with a particular prefix. You can consider using this option when you want to track specific subfolders. For example https://m.yourwebsitedomain.com/ for the mobile version of your website.
Note that you can add both Domain as well as URL Prefix property at the same time for your website. However, it is usually preferred (and recommended) to use the Domain property option.
That said, if you decide to go with the Domain property option, you’ll need to verify your domain property before you can start using GSC to improve your site’s SEO performance.
How to Verify Domain Property
Google provides numerous ways to verify your website ownership such as:
- DNS record
- HTML file upload
- Meta tag
- Google Analytics Tracking Code
- Google Tag Manager
But if you’re adding a domain property, adding a DNS record to your domain name provider is the only site ownership verification method out of these five methods.
This is mainly because GSC collects a ton of information and insights of websites that you wouldn’t want any unauthorized individuals to get access to. This is the primary reason why Google asks for website ownership verification in the first place.
So, if you have chosen to add a Domain property, you’ll be asked to verify your domain ownership via DNS record as shown below:
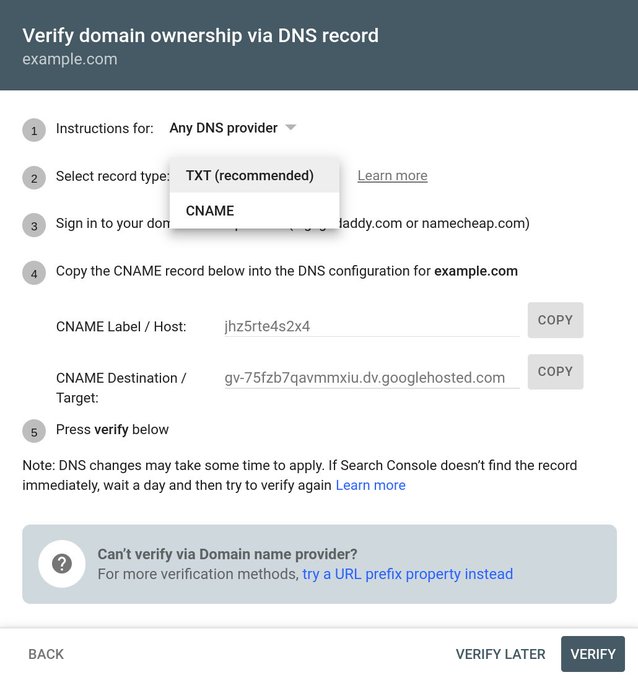
Check if your domain name provider is listed in the drop-down menu or not. If it is listed, you just need to select it and GSC will automatically begin the authorization process by itself.
In case your domain name provider isn’t listed on the drop-down menu, you’ll need to copy the TXT record and follow the Google-provided domain verification process for your domain name provider.
Once you’ve added the TXT DNS record to your domain name provider and Google verifies it, it’s finally time to start using GSC. You can now verify domain property using CNAME DNS record as well. Google has recently made the announcement on Twitter that they’ve finally added the option to verify a website using CNAME record in the Google Search Console.
We're happy to let you know that starting today you'll be able to verify your website on Google Search Console using a DNS CNAME record 🎉 Learn more about it on this Twitter post pic.twitter.com/uoxko5X6s0
— Google Search Central (@googlesearchc) July 20, 2022
To verify your domain property using CNAME DNS record, simply select 'CNAME' from the dropdown menu of 'Select Record Type' and proceed as per the instructions that appear afterwards.
For more details, please check the official announcement on the Search Console Help Center.
Using GSC Features to Improve Your Site’s SEO Performance
Google Search Console is equipped with a plethora of features that ultimately help website owners to improve their site’s SEO performance.
So let’s dive into the key features of GSC and how to use them for your SEO.
Overview Report
As soon as you’ve verified the ownership of your website, you’ll be redirected to the Overview Report page as shown below:
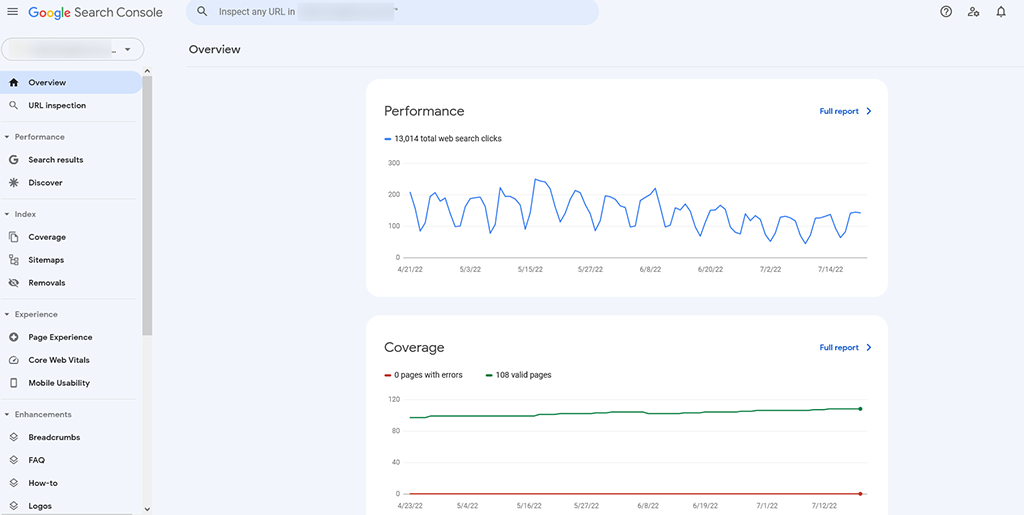
The Overview Report gives you a snapshot of how exactly your website is performing in search engines and whether or not there is something that needs to be fixed.
The Overview Report lets you:
Check How Many Pages Have Been Indexed
To check how many pages of your website have been indexed by Google, you need to:
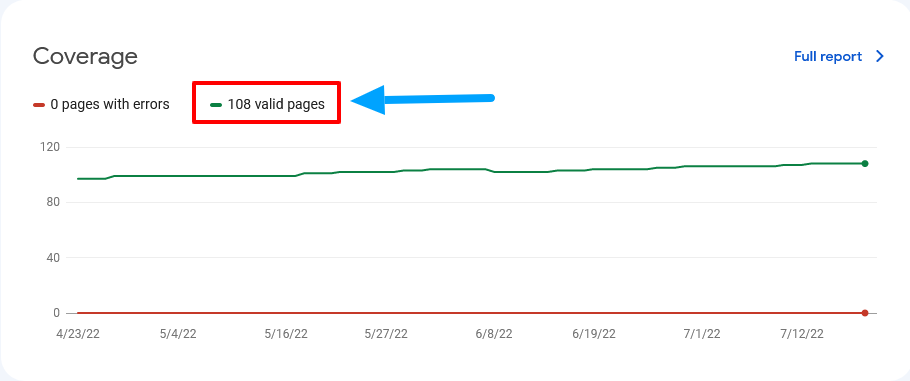
- Go to Overview on the left-side panel
- Find the Coverage section
- Check the number of Valid Pages
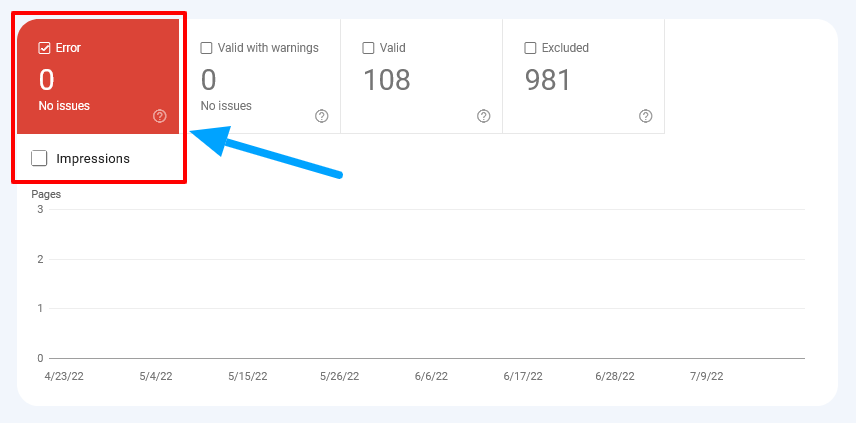
Check Indexing Errors
To check indexing errors, click the Open Report button and mark the Error, Valid with Warnings, Valid, and Excluded checkboxes.
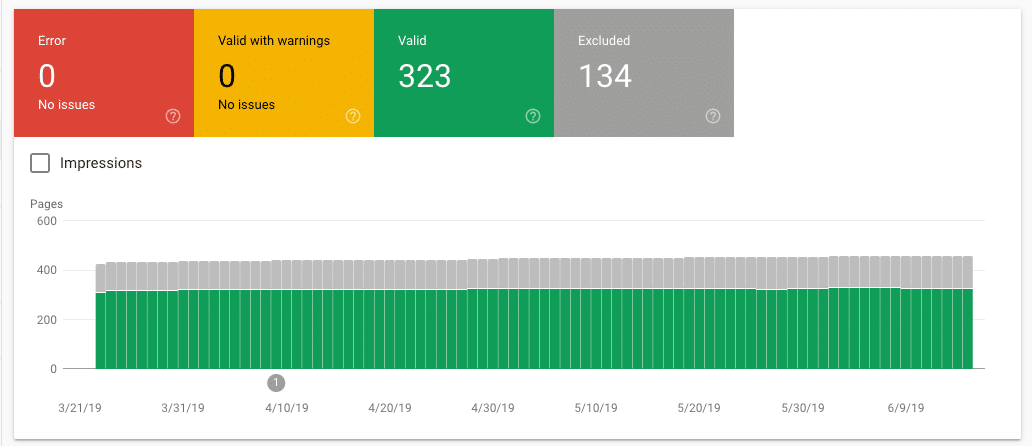
Once you do that, you’ll be presented with your website's total number of indexed pages. This number should increase over time as you create new pages and publish new blog posts on your website.
At the same time, make sure to keep an eye on the number of Errors.
If you notice the number of Errors rising at any given time, address them as soon as you can. Not resolving the errors can sometimes prevent Google from indexing your freshly-created pages and recently-published blog posts.
Check Mobile Usability Issues
Since Google has been pushing for mobile-first indexing for years, it makes sense to ensure your website works perfectly well for mobile devices.
For this, GSC even provides a feature to check mobile usability issues in your website.
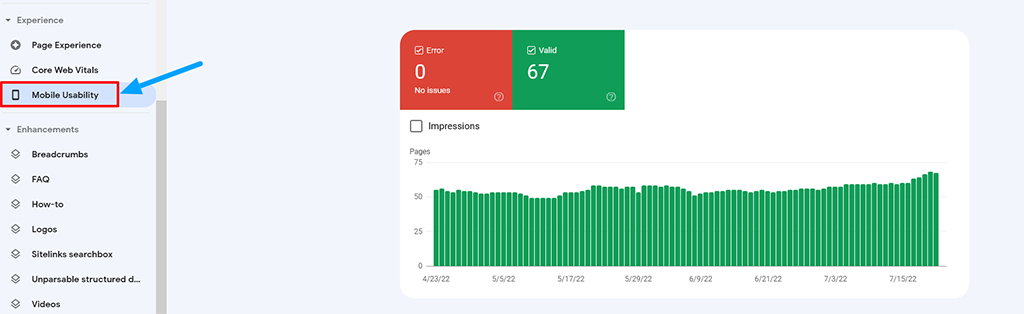
Here’s how you can check for mobile usability issues:
1. Expand the Enhancements menu from the left-side panel
2. Click the Mobile Usability option
3. If you see any errors, you can go to its details box to learn what is causing mobile issues
4. To check which pages are affected, double-click on any error type
Performance Report
The Performance Report tells you how your website is performing via important metrics like average position, how often it appears in search results, click-through rate, and even helps to simplify your hunt for complex search queries through RegEx.
If you’re interested to learn more about using RegEx, we’ve written a separate guide that teaches how to use RegEx in Google Search Console in detail.
There are numerous ways to use Performance Report to improve your site’s SEO performance.
The Performance Report helps website owners to:
Find Highest Traffic Pages
Finding the highest traffic pages of your website in GSC is quite simple:

1. Click Performance on the left-side panel
2. Go to the Pages tab given right next to Queries
3. Change the date range to your choice to get an overview of your website traffic for a specific period
4. Mark Total Clicks if it isn’t
5. Lastly, click the small downward arrow right before Clicks to sort the list of your pages from highest to lowest and vice versa
Find Search Queries with Highest CTR
Just like the highest traffic, it’s equally easy to find search queries with the highest CTR:
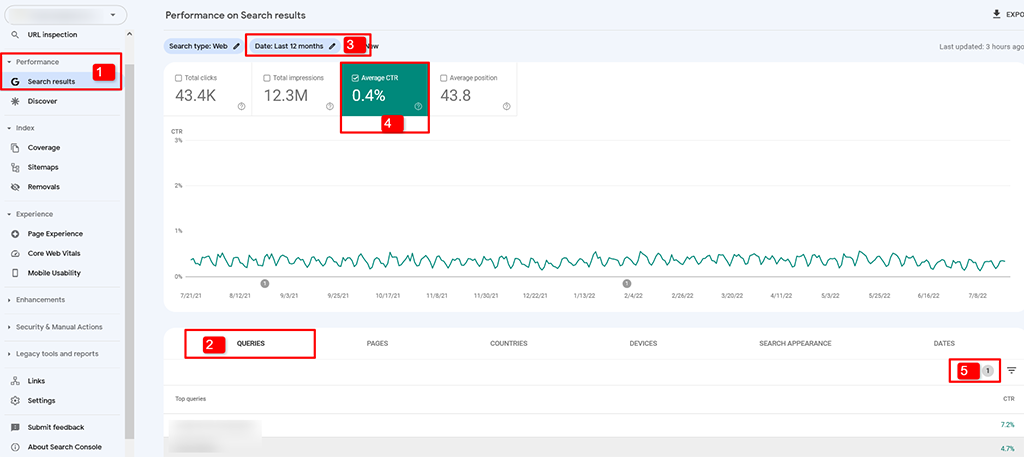
1. Click the Performance on the left-side panel
2. Go to the Queries tab
3. Change the date range to your choice to get the list of search queries with the highest CTR for the selected period
4. Lastly, click the small downward arrow right next to CTR to sort the list of queries from highest to lowest and vice versa
Find Highest and Lowest Ranking Pages
Here’s how you can find the highest & lowest ranking pages of your website in Google Search Console:

Click Performance on the left-side panel>
Go to the Pages tab
Change the date range to your choice
Select Average Position
Finally, click the small arrow right next to Position to sort the list of pages from highest ranking to lowest ranking and vice versa
Compare Ranking Increase and Decrease
Here’s how you can find and compare ranking increase and decrease in GSC:
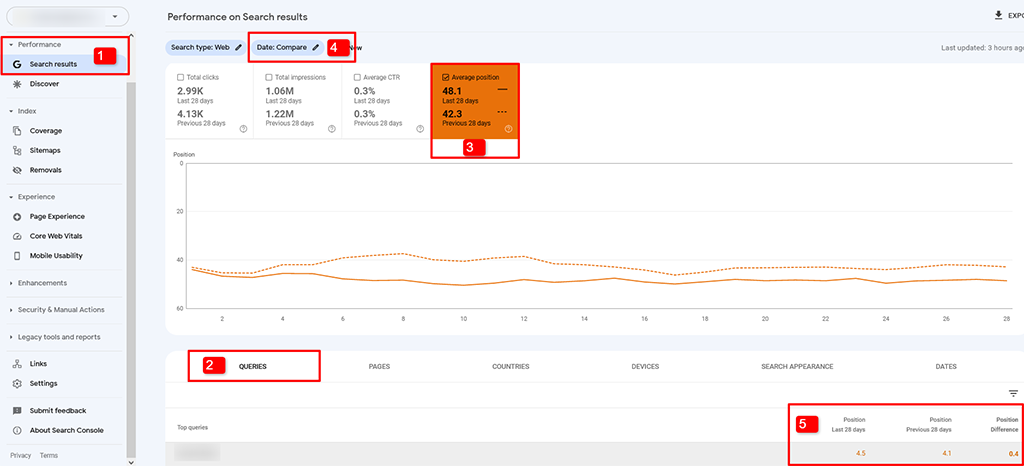
1. Click Performance on the left-side panel
2. Go to the Query tab
3. Select Average Position
4. Click Date Range and then Compare tab to select two different periods
5. Hit the Apply button
6. Now analyze how rankings have changed between those two selected periods
Find Highest Traffic Queries
To find the highest traffic queries in GSC, you need to:
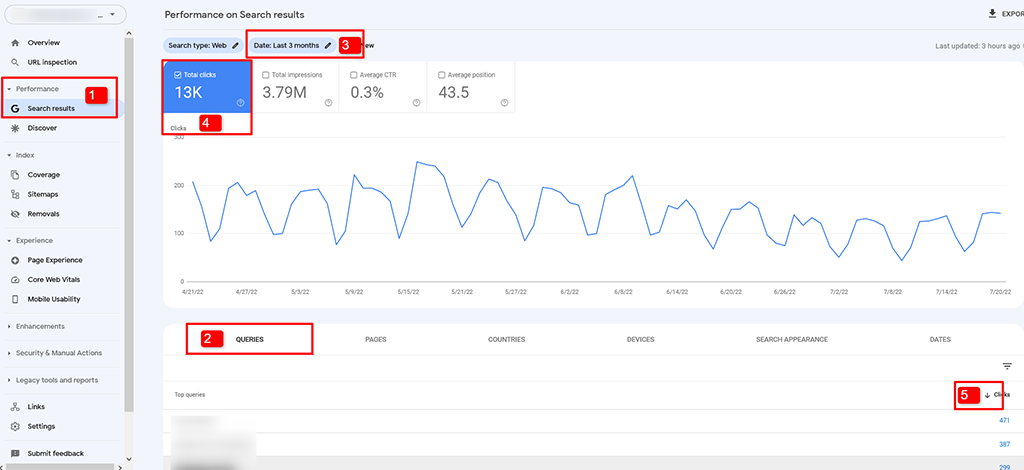
1. Click Performance on the left-side panel
2. Go to the Query tab
3. Select a Date Range of your choice
4. Select the Total Clicks metric
5. Click the small downward arrow right next to the Clicks label to sort the list from highest to lowest and vice versa.
Compare Site Performance Across Devices
Here’s how you can compare site performance across devices in Google Search Console:
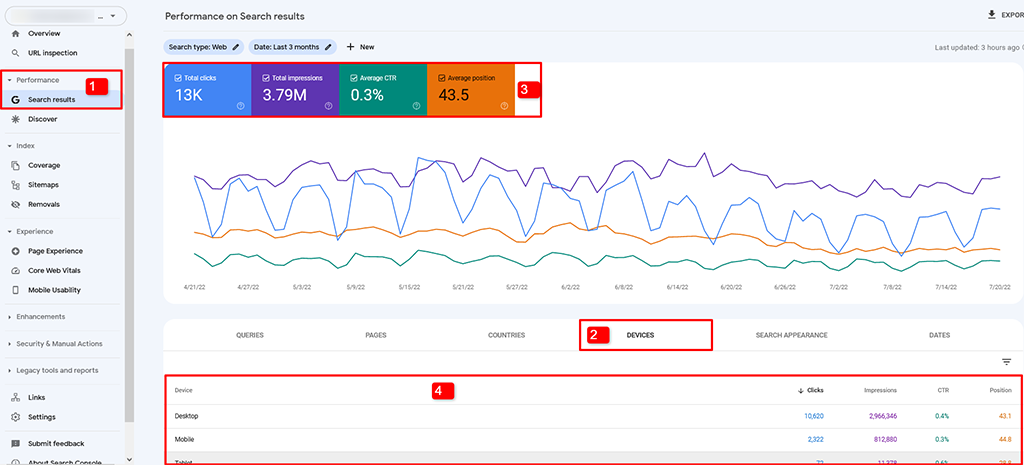
1. Click on Performance from the left-side panel
2. Go to the Devices tab
3. Select all metrics shown on the page
Compare Performance Across Countries
Comparing performance across countries is just as easy as comparing performance across devices.
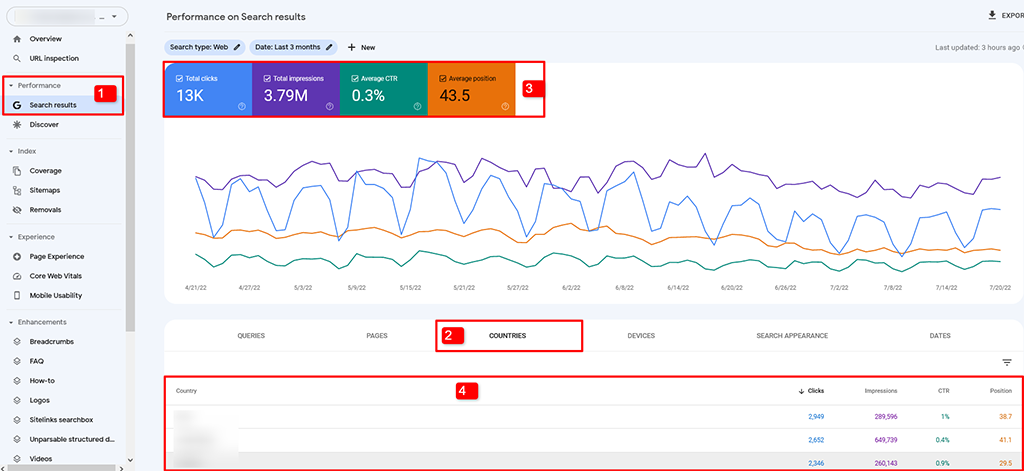
1. Click on Performance from the left-side panel
2. Go to the Countries tab
3. Select all metrics
4. Check and compare performance across all countries
Index Coverage Report
The Index Coverage Report tells website owners whether Googlebot is facing any issues while crawling and indexing their webpages.
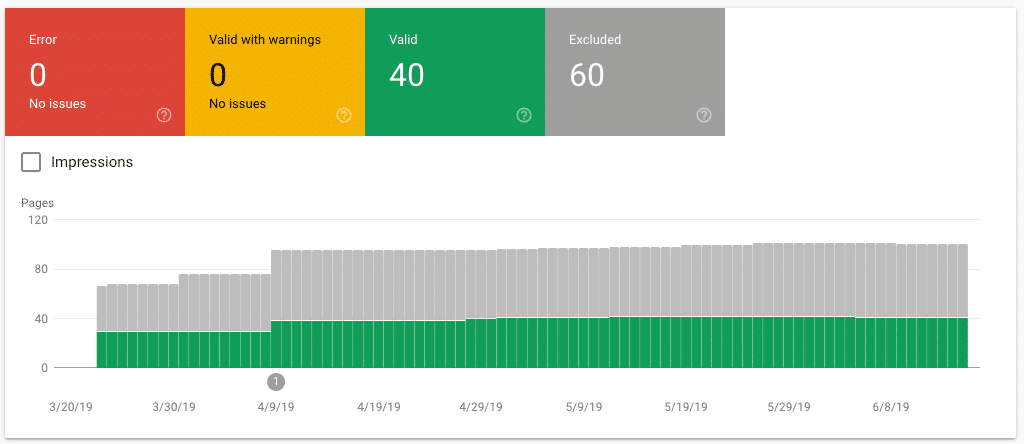
Each bar in the index coverage report represents the status of every single day. The bars are even coloured to differentiate such as:
- Error - Red
- Valid with Warnings - Yellow
- Valid - Green
- Excluded - Grey
Whenever you see the number rising in Error and Valid with Warnings metrics, it goes without saying that you must always address and resolve Errors (in red) first.
These errors are usually the biggest obstacles for Googlebot to crawl and index pages of your website.
That said, let’s check out the main causes of errors that lead to preventing your website pages from getting indexed by Google.
Cause of Errors
There are various reasons why Errors occur in the Google Search Console. Below are the most common causes that you need to be aware of and learn to resolve.
Redirect Error - This error occurs when a redirected page is not working properly. To fix this issue, you need to check your .htaccess file as well as your redirect rules for the page with the issue to resolve this error.
Server Error (5XX) - This error occurs when Googlebot can’t reach your website server, which generally happens when the server is under maintenance. If you see this error in your GSC, immediately contact your hosting provider to get it resolved as quickly as possible.
Submitted URL has Crawl Issue: This error usually occurs when a page is blocked from Googlebot in your Robots.txt file. However, it’s not always the reason why this error occurs. Sometimes, this issue occurs because of some entirely different reason. So, when you see this error, make sure to check the details of the error and investigate the matter.
Submitted URL Seems to be a Soft 404 - This error is shown when a page on your website cannot be found by Google. It mostly occurs because of a temporary bug and can be easily fixed by investigating the page with this issue in GSC.
Submitted URL Not Found (404): This error is generally shown when a page is not accessible on your website. When you try to access it via its direct URL, it shows a 404 error page. To resolve this error.
How to Solve 404 Errors
404 errors indicate that your URLs are no longer accessible to Googlebot. This error mostly occurs when a page on your website no longer exists or its URL has been changed.
Here’s what you need to do to find if you’ve any 404 errors or not:
1. Go to the Index section
2. Click the Coverage option
3. Click the Error metric as shown in the screenshot
Once you obtain the list of URLs with issues, you need to fix them as soon as you can.
Google Search Console reports all past as well as present 404 errors on your website.
Now, the simplest way to solve most 404 errors is to either fix the issue that is causing it or simply redirect the affected pages to new URLs.
In case you’re redirecting the affected pages, make sure to use 301 Permanent Redirect instead of 307 Temporary Redirect. 301 Permanent Redirect is the best solution to resolve the issue permanently and get your affected pages reindexed with the new URLs.
Having said that, if you’re new to SEO and GSC, you may want to get a professional SEO agency to help you identify and solve crawling and indexing issues on your website.
URL Inspection Tool
URL Inspection Tool lets website owners find out how Google actually sees their website. This tool can come in handy when a page on your website is having issues appearing on Google search results.
Here’s how to diagnose the issue using the URL Inspection Tool:
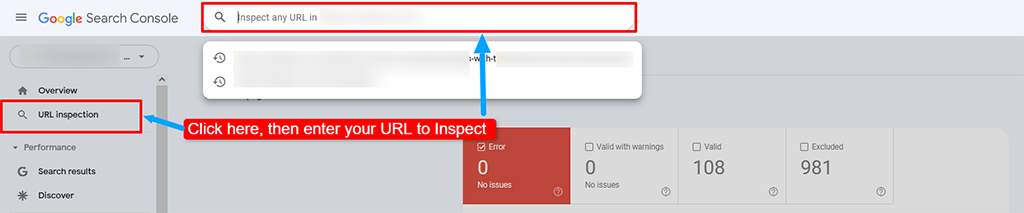
1. Click URL Inspection on the side panel
2. Enter the URL to inspect
3. Hit the Enter button on the keyboard
As you hit Enter, you’ll be presented with results that tell whether the entered URL is indexed and can appear in Google search results or not.
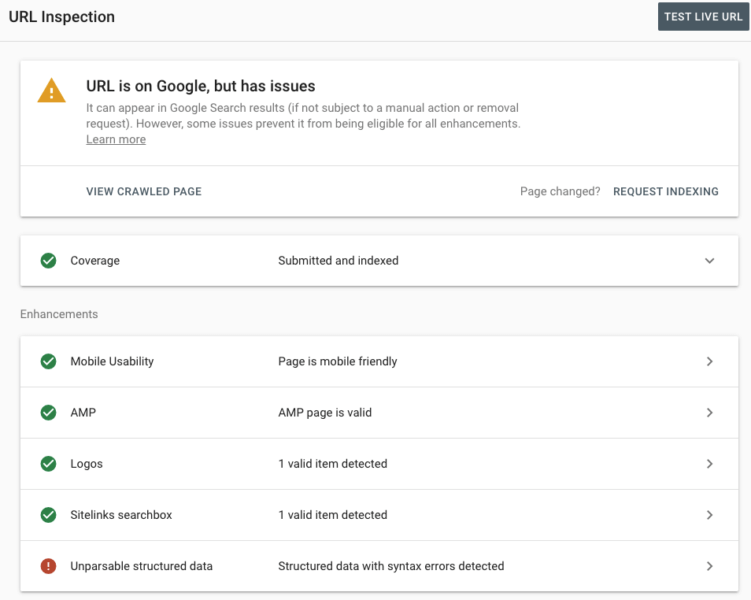
If there are any issues with the entered URL, you’ll be able to see the causes of the issue.
To find everything about how the entered URL appears on Google, expand the Coverage section and you’ll be able to learn:
- If the page has assigned disallow indexing
- If Googlebot is allowed to crawl this page
- If Googlebot can fetch this page
- The last time Googlebot crawled it
- Sitemaps that point to that page
- Canonical URL set for this page
- The referring page that led Googlebot to this page
- Canonical URL that Google has chosen to consider for this page
However, the challenge with the URL inspection tool is that you can only inspect one individual URL at a time. If you have a large website with thousands of pages, this can take up a lot of time.
To deal with this, Google has recently introduced the Google Search Console URL inspection API that allows external tools to interact with GSC and perform URL inspection at scale.
Page Experience Report
Google added the Page Experience Report feature to GSC ahead of making Page Experience a ranking factor in their coming algorithm update.
The Page Experience Report combines the Core Web Vitals Report along with other related SEO metrics that are part of the Page Experience Algorithm Update.
The Core Web Vitals data are obtained from Chrome User Experience Report which collects remote performance metrics of your site visitors.
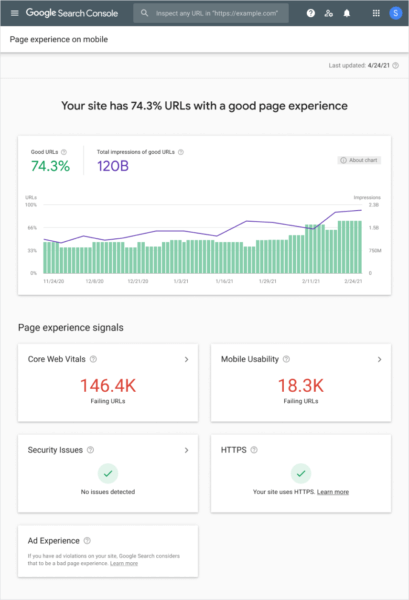
The Page Experience Report provides a lot of insights such as:
The percentage of good URLs
Total impressions garnered from good URLs
Total number of failing URLs
Security issues that are preventing your site from being considered a good page experience
Number of pages that use HTTP instead of HTTPS
Although, Google did say that great content will continue to have more impact on the ranking of a website than page experience. In simple words, pages with great content and poor page experience may still have the probability of ranking on top of Google search results.
But if the quality of your website content is similar to your competitors, then providing a good page experience can give you an edge over your competitors in the Google search results.
Therefore, paying attention to Page Experience Report regularly and improving failing URLs from time to time can give you the boost your website needs to improve rankings, increase traffic, and grow your user base.
Sitemaps Report
A sitemap is usually an XML file that contains a list of all URLs of your website. The purpose of sitemaps is to help search engine crawlers discover web pages of your website.
A sitemap is not a necessity to show up or rank in top positions on Google search results.
Google has already said that its web crawlers can normally find most of the pages of a website given that they’re linked to each other logically.
However, there are certain situations where creating and submitting a sitemap of your website could be helpful.
When your website is really big
If your website has hundreds of pages, Googlebot might miss discovering some pages (including important ones) of your website. In such a case, you should most certainly generate and submit a sitemap of your website to Google Search Console.
When your website has “isolated” pages
If your website has pages that are not internally linked to the other pages of your website, it increases the difficulty for Googlebot to discover them.
When your website is new
If you have just launched your website and it has close to zero backlinks from other websites, it is not so discoverable for web crawlers to find and index. A sitemap can help Googlebot in discovering and indexing your new website.
When your website shows up in Google News
If pages of your website show up in Google News, submitting a sitemap can make it easier for Google to properly format and display the content in the search results.
The best part is that generating a sitemap for your website is quite easy. There are plenty of sitemap generation tools available to help you.
The Google Search Console has a separate feature to submit and check for errors in the Sitemaps Report.
Here’s how you can submit a sitemap in Google Search Console:
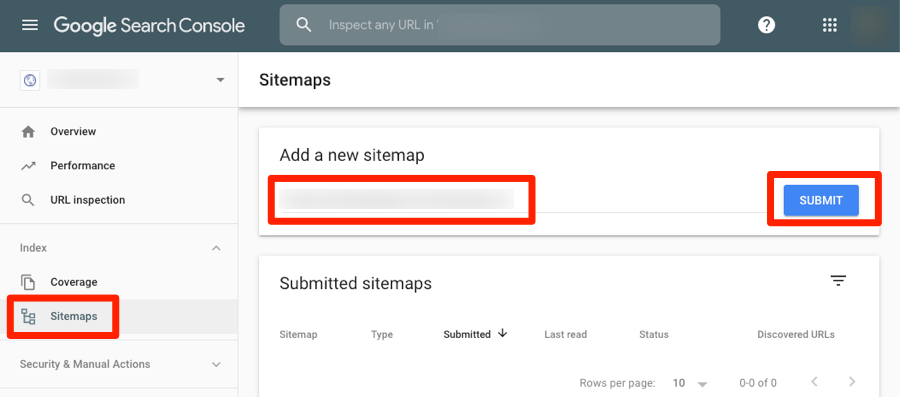
1. Head over to the Sitemaps section on the left-side panel
2. Add the new sitemap URL
3. Click the Submit button
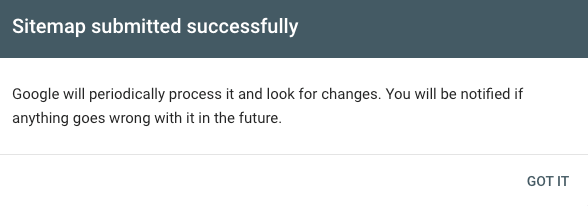
Once you submit the sitemap, you’ll be prompted with the following message:
Links Report
The Links Report in Google Search Console lets website owners see internal links and backlinks (sites that link to yours and what anchor text they’ve used).
Using the Links Report, you can obtain a variety of insights such as:
How many Backlinks your Site has
Backlinks are a ranking signal that indicates that your website content is trustworthy to Google. You can think of backlinks as “Votes” for your websites from other websites.
So, the more backlinks you create from other sites, the higher chances of your site ranking in the top positions on Google search results.
To find out how many backlinks your site currently has, you need to:
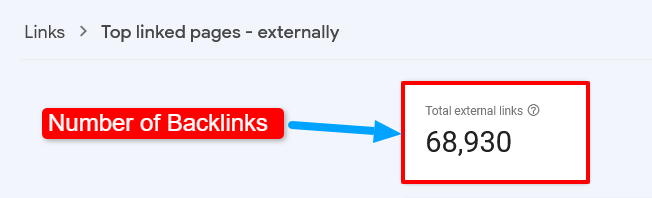
1. Go to Links section on the left-side panel
2. Expand External Links menu and click the Top Linked Pages report
3. Find Total External Links box
4. Click the small arrow right to Incoming Links to sort the list from highest to lowest and vice versa
Find Which Pages have Most Backlinks
Here’s how you can find which pages on your website have the most backlinks:
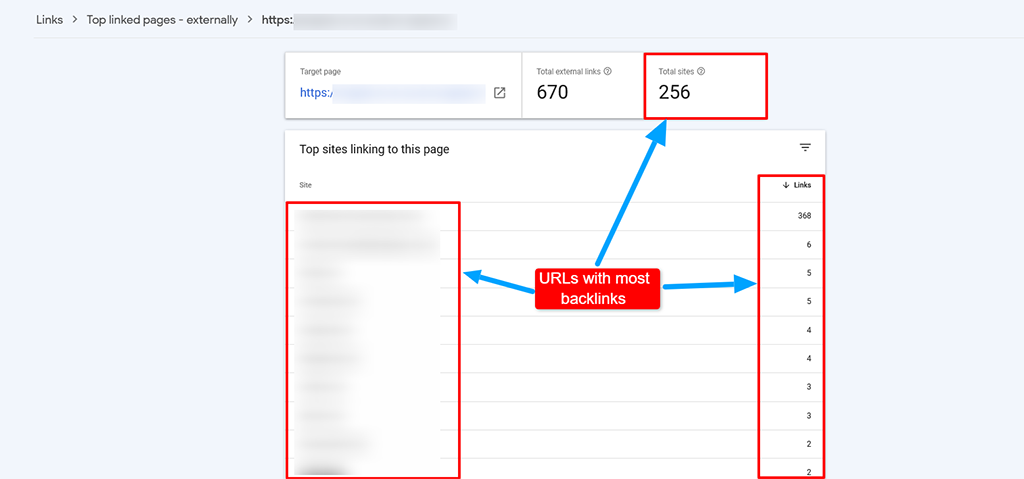
1. Click Links on the left-side panel
2. Expand External Links menu and click the Top Linked Pages report
3. Click the downward arrow right next to Links to sort the list from highest to lowest and vice versa
4. Click any specific link to check which external websites are linking to that particular page
Find Pages with Most Internal Links>
Internal links are the hyperlinks from one page to another within a website. It’s extremely useful to both, search engines to discover pages on your site & visitors to navigate easily throughout your site.
Finding pages with most internal links is just as easy as finding pages with most backlinks.
Here’s how to find pages with most internal links in GSC:
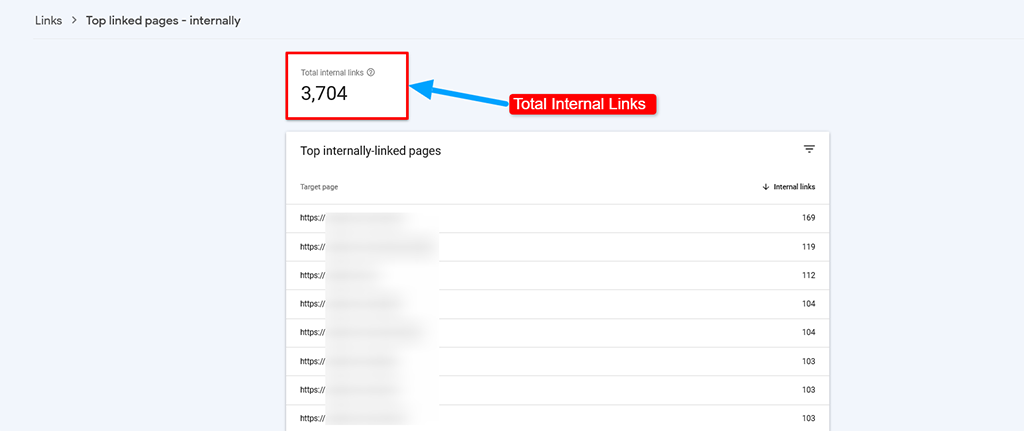
1. Click the Links on the left-side panel
2. Expand Internal Links menu and click Top Linked Pages report
3. Click More option given at the end
4. Click the downward arrow right next to Internal Links to sort the list from highest to lowest and vice versa
Most websites normally have some pages with more internal links than others. Just remember to add internal links wherever there is an opportunity as it helps to pass the link juice around your website.
Final Thoughts
We’ve finally arrived at the end of this long post. Congratulations for making it to the end of this post.
Hopefully, you now have sufficient knowledge to start using Google Search Console to improve your site’s SEO.
Besides this, GSC can be helpful in resolving penalties and security breaches. This, in turn, can contribute to helping website owners achieve better search visibility and presence.
That said, if you face any roadblocks while trying to use GSC to improve your site’s SEO performance, feel free to get in touch with us at any time for professional assistance.

-
Hardy Desai
Hardy is the visionary founder of Supple Digital, a boutique SEO agency based in Melbourne, Australia. With a profound understanding of the digital landscape and a deep passion for innovation, Hardy has steered Supple Digital to become a leading name in the SEO domain.


DIGITAL MARKETING FOR ALL OF AUSTRALIA

- SEO AgencyMelbourne
- SEO AgencySydney
- SEO AgencyBrisbane
- SEO AgencyAdelaide
- SEO AgencyPerth
- SEO AgencyCanberra
- SEO AgencyHobart
- SEO AgencyDarwin
- SEO AgencyGold Coast

- We work with all businesses across Australia